Microsoft Excel is an extremely effective tool for refining and analyzing data, from the most basic to the most complicated. However, there may be moments when your data is not correct. A long CSV import failed, or you must separate the names to reorganize them. Fortunately, the TEXTSPLIT function in Excel provides a fast, inline method to execute operations like these.
What Is TEXTSPLIT Function In Microsoft Excel?
The TEXTSPLIT function divides the text into cells depending on the separators you provide. You may split text over rows, columns, or both rows and columns, and you can set various split criteria. These capabilities are available in Excel’s Convert Text to Columns Wizard. Still, TEXTSPLIT provides those capabilities and is more inline as a function, which may be more effective for constructing complicated arrays or for power users who are already comfortable with using specialized functions.
Understanding Syntax Of The TEXTSPLIT Function
The TEXTSPLIT function has the following syntax.
=TEXTSPLIT(text,col_delimiter,[row_delimiter],[ignore_empty], [match_mode], [pad_with])Six arguments and parameters are sent to the function. The text argument specifies the data that will be split. This may be a reference to a particular cell or set of cells or to text inside the argument that you describe.
The col_delimiter specifies the character or text that will operate as the separator; when the function finds this character, it will split the text into a new column. The row_delimiter option works similarly, except if a character is specified here, it will be used to split the text into new rows rather than into new rows.
The delimiter may be a conventional separator character, such as a period, comma, or space, or it can be a distinct symbol, a letter, a number, or even a multi-character text string or set of words. For the function to operate correctly, at least one of the delimiter parameters must be given.
It should be noted that this function may define numerous distinct row or column delimiters. In this situation, the delimiters must be enclosed inside a set of curly brackets (the keys), as seen in the example below.
=TEXTSPLIT("Sample text",{"e","t"})Also, although it is not recommended or necessary if a value in both col_delimiter and row_delimiter is the same, col_delimiter is favored.
The ignore_empty argument determines whether to bypass delimiters resulting in blank cells. For example, TEXTSPLIT would produce two blank cells by default if three commas were adjacent in the data for the “text” argument. You may instruct the function to ignore delimiters resulting in blank cells by setting ignore_empty to FALSE or TRUE.
The match_mode option specifies whether separator matching in the function should be case-sensitive. This is important if you need to use letters as delimiters; for example, you could want to instruct Excel to split cells on every capital letter “T” but ignore any lowercase letter “t.” Setting this argument to “0” keeps the default behavior, making all delimiters case-sensitive. Change it to “1” to make separators case-insensitive.
The pad_with argument specifies replacement text to fill in blank cells, especially in arrays with excess space after all appropriate separators have been accounted for. It produces a “#N/A” error by default, so if you believe the problem will occur in your data, change this to something different.
How To Use TEXTSPLIT Function In Excel?
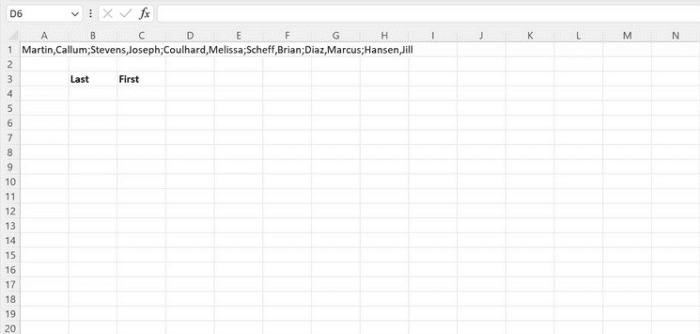
Assume we have been given a list of names. They have a distinct sequence, but we need to restructure them to make them more legible and simpler.
As you can see, the goal is to divide the names into “Last” and “First” columns. Select cell B4, and then type the formula provided below into the cell or the formula bar above. Then hit the Enter key.
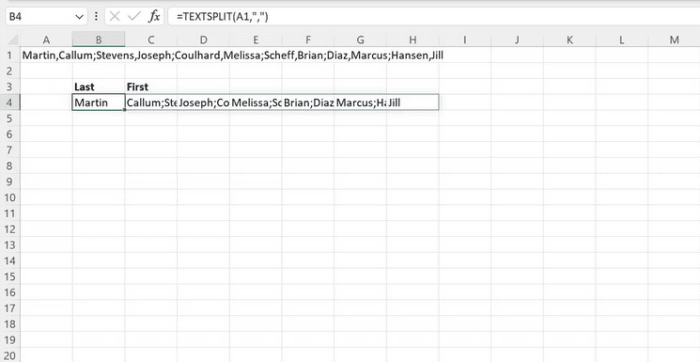
=TEXTSPLIT(A1,",")Where there was once a comma, the names are now divided into a new column. However, the data has been sprinkled throughout a single row, which must still be clearer. We can remedy this by adding another delimiter to split the data into distinct rows.
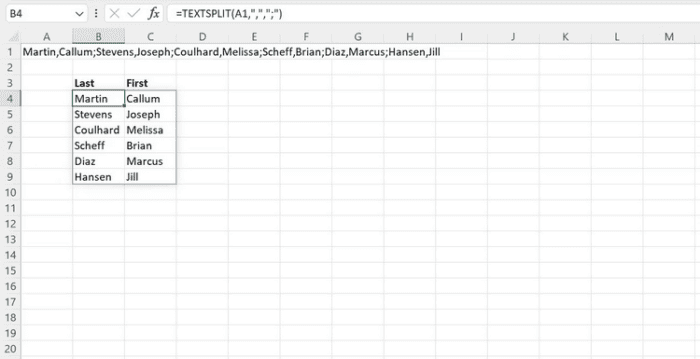
Select cell B4 once again, and then type the formula indicated below into the cell or the formula bar above. Then hit the Enter key.
=TEXTSPLIT(A1,",",";")It is now more of what we expected. Every comma in the data breaks each portion of the whole name into its cell across columns in the new, revised formula, while every semicolon splits each name into its row.
Also, Check:
Conclusion:
The TEXTSPLIT function in Microsoft Excel is a brilliant tool in the arsenal, providing another handy approach to fight data obstacles and generate unexpected outcomes according to how you interact with information. It makes modifying, rearranging, and reorganizing your data a breeze and may become a beneficial addition to your data workflow with little training and experience.


